How to Add LED Strip Lighting to Closet Shelves: A Complete DIY Guide
-
- 127
html
How to Add LED Strip Lighting to Closet Shelves
A well-lit closet makes a real difference. You stop digging through shadows trying to tell black socks from navy, and your clothes look like they belong in a proper store display. Closet LED lighting installation is something most homeowners can handle themselves. This guide covers planning, tools, the actual steps, and the mistakes that trip people up. It’s practical, not fancy.
. For more ideas, check out How to Install a Full-Length Mirror on a Closet.
What You Need: Tools and Materials for Closet LED Lighting
Before buying anything, get a clear picture of what the job requires. The wrong adhesive or a weak power supply can turn a straightforward project into a headache. Here’s the short list:
- LED strip kit: Go for high CRI (90+ for color accuracy). Color temperature depends on preferenceâ2700K is warm, 3500K to 4000K is neutral. Cheap off-brand strips tend to fade or change color within a year.
- Power supply or driver: Match the voltage exactly (12V or 24V). Make sure it covers the total wattage of your strips with about 20% extra room.
- Connectors and solderless clips: They make connecting strips much simpler. A reliable set of connectors and clips is cheap insurance against frustration.
- Wire cutters and strippers: Basic tools for trimming and preparing wires.
- Measuring tape: Measure twice. Cut once.
- Alcohol wipes or isopropyl alcohol: Surface prep matters more than most people realize.
- Adhesive clips or mounting channels: The adhesive backing on strips is okay for clean surfaces. For textured shelves or longer runs, clips or channels prevent peeling down the road.
For a plug-in setup, an extension cord and a smart plug add convenience without extra wiring. Hardwired jobs need a junction box, wire nuts, and a voltage tester. The choice between hardwired and plug-in comes down to how permanent you want the look and how comfortable you are with electrical work.
Step 1: Plan Your Lighting Layout Before You Buy Anything
This step gets skipped more than any other. People buy a strip, cut it in a hurry, and end up with sections that don’t reach. Start by measuring every shelf you plan to light. Write down the exact lengths. Don’t assume shelves are the same sizeâclosets often have odd dimensions.
Next, think about zones. A reach-in closet with one shelf might need a single strip. A walk-in with multiple tiers and hanging rods benefits from separate runs for different areas. Motion sensors make sense for walk-insâwalk in, lights come on, no switch to find. For reach-in closets with doors, a switch near the door works fine.
Color temperature changes the feel of the space significantly. Warm white (2700K) looks like incandescent bulbs and feels cozy. Cool white (4000K) is sharper and better for seeing fabric colors clearly. I usually settle on 3000K for closetsâwarm enough to be inviting, bright enough to see details. Stay under 4000K unless you have a specific reason for daylight-like light.
A common mistake: buying a strip that’s a few inches too short because you didn’t think about corners or where the power supply will sit. Add 10â15% to your total length. Plan for the power supply to be somewhere accessibleânear an outlet for plug-in setups or in a junction box for hardwired ones.
Step 2: Choosing Between Hardwired, Plug-In, and Battery-Powered Strips
Each option has strengths. The right one depends on your closet layout, your skills, and how permanent you want things to be.
Hardwired: Cleanest look. No visible cords or plugged outlets. But it requires basic electrical knowledge. You tie into an existing circuit, install a junction box, and meet local codes. Best for walk-in closets where you’re already remodeling and want the lighting integrated. If you’re not comfortable with electrical work, hire an electrician. Best for: permanent setups, large walk-in closets, experienced DIYers.
Plug-in: Easiest option for beginners. Most LED strip kits come with a plug-in transformer. Run the strip, plug it in, done. The tradeoff is the cordâyou’ll need to hide it or route it neatly. Cable clips or adhesive cord covers help. Best for: renters, reach-in closets, quick weekend projects.
Battery-powered: Handy if there’s no nearby outlet and you don’t want to drill. The downside is battery life. Even good batteries need swapping or recharging if the lights are on more than a few minutes at a time. Some motion-sensor battery strips work fine for small closets with light use. Best for: temporary setups, closets with zero electrical access, last resort.
For most residential closets, plug-in is the way to go. It’s the sweet spot between convenience and performance.
Step 3: How to Cut and Connect LED Strips for a Clean Fit
LED strips have cut points marked every few inches. Look for the scissor icon or copper pads. Only cut at those points. Cutting elsewhere breaks the circuit.
Here’s the process:
- Measure the length you need. Mark the cut point clearly.
- Use sharp scissors or wire cutters. Clean cuts help connections hold.
- Expose the copper pads on both cut ends. Some strips have a thin coating that needs to be peeled back.
- Attach a solderless connector by pressing the prongs into the pads and snapping the cover closed. Make sure the arrow on the connector matches the current direction on the strip.
- If soldering, tin the pads first, then apply the wire and heat. Soldering is more reliable but takes practice.
A common problem: connecting with polarity reversed (positive to negative). Most connectors are keyed to prevent this, but always double-check. A loose connection causes flickering or no light at all. Test each segment before mounting. It’s much easier to fix connections on a workbench than after the strip is stuck to a shelf.
For multiple strips, use Y-connectors or junction connectors. Avoid daisy-chaining strips end-to-end with wireâit increases resistance and causes voltage drop. Instead, run individual wires from the power supply to each strip.
Step 4: Mounting the LED Strips to Closet Shelves
Mounting seems simple, but placement and surface prep determine longevity.
Clean the shelf surface thoroughly with isopropyl alcohol. Let it dry completely. Dust and grease weaken the adhesive over time. For wooden shelves, wipe with a damp cloth first, then alcohol. For painted shelves, make sure the paint is fully cured.
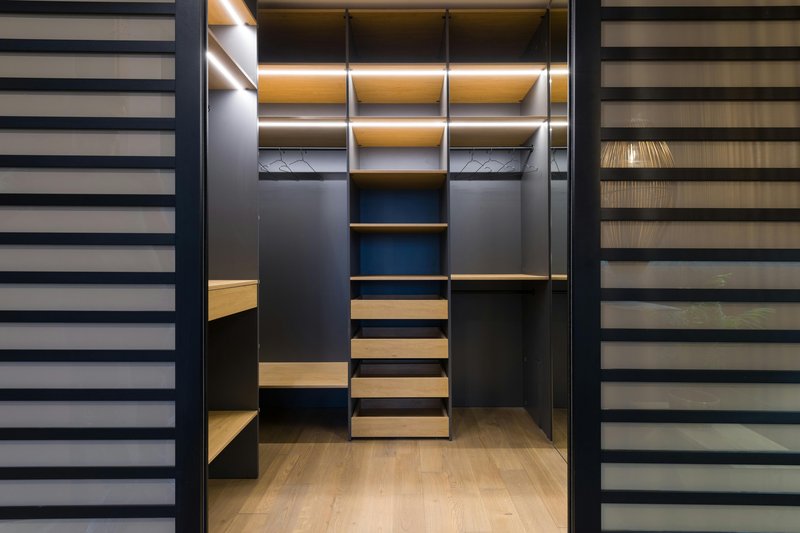
Position the strip under the shelf lip, facing downward. This creates a smooth, indirect glow that lights items below without exposing the diodes. For floating shelves or glass shelves, mount the strip against the back edge facing forward for a hidden effect.
. If you’re interested in related upgrades, see our guide to How to Calculate Closet Linear Footage: A.
Avoid mounting strips directly on the shelf surface facing upâyou get harsh hotspots and visible diodes, which looks cheap. If your shelf has a decorative edge, tuck the strip just behind it.
For longer runs, use adhesive clips every 12â18 inches. Aluminum channels provide the most secure mount and help dissipate heat. In humid areas or closets near bathrooms, channels are worth the extra cost. Aluminum mounting channels give a professional finish and prevent peeling.
Run your finger along the strip after mounting to ensure full adhesion. Any loose sections start sagging within weeks.
Step 5: Wiring and Powering Your Closet LED Lighting
This step determines whether the setup ends up clean or messy.
For plug-in setups: connect each strip’s wire to the power supply’s output terminals (positive to positive, negative to negative). Use the connectors that came with your kit. For multiple strips, use a distribution block or multi-port connector to avoid overloading a single connection.
For hardwired setups:
- Run 14/2 or 12/2 NM cable from your switch or junction box to the closet location.
- Install a junction box near the power supply location. The box must be accessible, not buried behind drywall.
- Connect the power supply to the junction box using wire nuts. Make sure the power supply is rated for the current load.
- If adding a switch, use a standard wall switch or a wireless relay for a cleaner look without cutting into walls.
Safety note: If the closet is within 6 feet of a water source (like a bathroom sink), use a GFCI breaker. Never daisy-chain multiple power supplies. Each set of strips should be on its own driver or a single driver rated for the total load. Overloading causes overheating and fire risk.
The main tradeoff here is time versus cost. A plug-in setup takes a couple of hours and costs maybe $50 in materials. Hardwired takes a full day, requires drilling and fishing wire, and may need drywall patching. If you’re not confident in your electrical skills, paying an electrician for the wiring makes sense. It’s cheaper than a fire.
Common Closet LED Lighting Installation Mistakes to Avoid
After a dozen installations, these are the errors I see most often:
- Underestimating brightness. One 5-meter strip isn’t enough for a walk-in with many shelves. Double the total length you think you need. Dim lighting is the most common complaint.
- Using the wrong adhesive. Cheap strips often have weak adhesive. Corners start peeling within a month. Use mounting clips or channels as backup.
- Daisy-chaining too many strips. Connecting them end-to-end causes voltage dropâthe far end will be dimmer. Run separate wires from the power supply to each strip.
- Ignoring heat buildup. LEDs generate heat, especially if enclosed in tight spaces or mounted on metal without airflow. Use channels that allow ventilation. Don’t stuff strips into tight corners.
- Skipping a test fit. Mounting strips permanently without testing connections first is asking for trouble. Tape the strips in place temporarily, wire everything, and turn it on. Fix dead segments or flickering before committing with adhesive.
These are easy to avoid with a little planning.
Best LED Strips for Closet Shelves: My Top Picks
Not all strips are the same. Here are three kits I’ve used and can recommend based on real installations.
1. Philips Hue Lightstrip Plus
Best for smart home integration. Dimmable, color-changeable, connects to Alexa and Google Home. High CRI (90+) and consistent brightness. The adhesive is decent but add clips for long runs. Expensive, but good if you want app or voice control. Best for: walk-in closets where you want ambiance control.
2. Govee LED Strip Lights (Smart WiFi)
Solid value. Multiple color options, decent CRI (80â85), and simple app control. Adhesive is averageâuse mounting clips. Works with Alexa and Google. Best for: reach-in closets or budget-friendly installs.
3. Waveform Lighting Premium Strip (High CRI)
Best for accurate color rendering. 95+ CRI, true 3500K temperature, and industrial-grade adhesive. Pricier than Govee but unmatched for seeing fabric colors correctly. Best for: anyone who needs precise color matching.
When shopping for a kit, look for one with a pre-wired power supply and connectors included. Avoid kits with less than 300 lumens per meter. Check if the strip is rated for indoor damp locations if your closet lacks ventilation. High CRI LED strip kits are worth the investment for accurate colors.
When Should You Call an Electrician Instead of DIY?
I’ve done plenty of DIY electrical work. I also know when to stop. Here’s when you should hire a pro:
- Adding a new circuit: Running new wire through walls means drilling studs and meeting code. This isn’t a beginner task.
- Local code requirements: Some places require permits for new lighting. An electrician makes sure it’s done properly and inspected if needed.
- Multiple zones with complex controls: Setting up three-way switches, dimmers, and motion sensors requires understanding relay circuits. Mistakes lead to erratic lighting.
- Work near plumbing: Running wire near pipes or in wet walls needs extra care. An electrician knows how to handle it safely.
If you’re comfortable with basic wiring and your closet already has a junction box or outlet nearby, DIY is fine. If you’re unsure, spend the $150â300 to have an electrician handle the wiring. You can still do the mounting and strip installation yourself.
Final Checklist for a Successful Closet LED Lighting Installation
Before starting, run through this list:
. For more ideas, check out Glamorous Walk-In Closet with Crystal.
- Measure all shelves and add 15% extra length.
- Choose power type based on your skill level.
- Select color temperature (3000K is a safe bet for most closets).
- Cut strips only at marked cut points.
- Test all connections before mounting.
- Clean mounting surfaces with alcohol and let dry.
- Mount strips under shelf lips or in channelsânot facing up.
- Use clips or channels for long runs.
- Connect to power supply with correct polarity.
- Test the whole system before closing up panels.
Follow these steps and you’ll end up with a closet that’s easier to use and looks better. Find your options here and pick the kit that fits your closet and comfort level.
Learn how to install closet LED lighting with our step-by-step guide. From planning to wiring, we cover the tools, tips, and common mistakes to avoid.
Learn how to install closet LED lighting with our step-by-step guide. From planning to wiring, we cover the tools, tips, and common mistakes to avoid.