How to Build a Custom Shoe Display Wall: A DIY Guide
-
- 119
How to Build a Custom Shoe Display Wall That Actually Works
If your sneaker collection has taken over the closet floor, or you’re tired of stepping over boots by the front door, a dedicated shoe display wall can be a practical upgrade. This guide walks through the main stepsâplanning, materials, installation, and common mistakesâso you can build a diy shoe wall display that looks good and holds up. Whether you’re a homeowner, a collector, or just need better storage, this should help.

Why Build a Dedicated Shoe Display Wall?
A custom shoe wall isn’t just for showing off. It’s about organization and making your morning routine a little smoother. Instead of digging through piles, every pair has a spot. It clears floor space in a bedroom, entryway, or closet, turning a cluttered necessity into something functional.
. For more ideas, check out DIY Closet Systems vs. Fully Custom Millwork:.
I’ve seen this work in small apartments where slim shelves replaced bulky racks, and in walk-in closets where collectors wanted their best pairs visible. The real benefit? You can see everything at once, which means you actually wear more of what you own. And honestly, it looks pretty good when done right.
Planning Your Shoe Wall Display Layout
Before buying a single board, spend some time on the layout. This is where most people rush and end up wishing they hadn’t.
Measure your wall carefully. Note the height, width, and any outlets or switches. Then think about what you’re storing. Sneakers generally work well on angled shelves that show the front profile, while heels and boots need flat shelves for stability. If you have a mix, consider a hybrid approachâangled shelves on the upper half, flat on the lower.
Decide between floating shelves, cubbies, or tiered racks. Floating shelves are minimalist and flexible. Cubbies keep pairs contained but limit how many you can display. Tiered racks are good for high density but can look busy. I usually lean toward floating shelves for most collections because they’re easier to adjust and clean. Sketch out your plan with approximate spacingâleave at least 12 inches of vertical clearance for sneakers and 14-16 inches for boots. If you need a level or measuring tape for layout planning, a reliable tape measure and level combo can simplify things.
Choosing Materials: Wood, Metal, or Acrylic?
Your material choice affects the look, durability, and cost of your diy shoe wall display. Here’s how they stack up:
- Plywood â The workhorse. Strong, affordable, and paintable. Go with 3/4-inch birch or oak for shelves that won’t sag. It’s what I use for most projects because it balances cost and stability. Best for walls holding heavy boots or large collections.
- MDF â Smooth and paintable, but heavy and prone to damage if wet. Fine for lighter sneaker displays in dry rooms, but I’d avoid it for basements or entryways where moisture might be an issue.
- Aluminum or Steel â Industrial look, very strong, and lightweight. Often used for shelving brackets and tracks. Works well for a modern, minimalist vibe. You’ll need a metal-cutting blade if you’re fabricating custom brackets yourself.
- Acrylic â Sleek and transparent, gives a high-end retail feel. It’s expensive and scratches easily, plus you need special tools to cut it cleanly. Best for small accent shelves, not full walls.
For brackets and rail systems, steel or aluminum gives you the most weight capacity. If you’re buying pre-made shelving, look for products with at least 50 pounds per shelf rating. Don’t skimp on bracketsâwobbly shelves ruin the whole effect.
Tools and Hardware You’ll Need
You don’t need a full workshop, but a few specific tools make the job much easier. Here’s what I keep on hand:
- Stud finder â A reliable one like a quality stud finder saves you from drilling into nothing. I’ve used a few models and accurate ones are essential.
- Level â A 48-inch level is ideal. Short levels lead to crooked shelves.
- Drill with driver bits â A cordless 18V or higher drill handles everything. An impact driver is a plus for sinking screws into studs.
- Circular saw or miter saw â For cutting boards to length. If you don’t own one, most home centers will cut lumber for you with reasonable accuracy.
- Screws and wall anchors â Use 2.5-inch deck screws into studs for load-bearing shelves. For drywall-only anchors, go with toggle bolts rated for 50+ pounds.
Optional but helpful: a jigsaw for cutting around outlets, sandpaper for smoothing edges, and a paintbrush or roller if you’re finishing the wood.
Step-by-Step Installation Guide
Here’s how I approach every diy shoe wall display installation. Follow these steps and you’ll avoid the most common headaches.
Step 1: Mark the studs. Use your stud finder to locate every stud behind the wall. Mark them with a pencil. This is essentialâshelves loaded with shoes can easily exceed 100 pounds, and drywall alone won’t hold.
Step 2: Determine shelf spacing. Based on your shoe types, mark horizontal lines where each shelf will go. I like to tape a level to the wall and draw light pencil lines as guides.
Step 3: Cut your shelves to size. Measure the wall width minus any gaps you want on the ends. Cut your boards cleanly. If you’re using plywood, sand the front edges for a finished look. A circular saw with a fine-tooth blade can help ensure clean cuts on plywood.
Step 4: Mount the brackets. Screw brackets directly into studs. If you’re using a rail system, attach the rail first, then hang the brackets. Always check level after tightening. I check for level twice before final screwsâonce when the bracket is hand-tight, and again after final torque.
Step 5: Attach the shelves. Lay the shelf on top of the brackets and secure from underneath with screws. For floating shelves, slide them onto the hidden brackets and lock into place. Make sure each shelf sits flush against the wall.
. For more ideas, check out How to Build an Industrial Walk-In Closet with.
Step 6: Test weight distribution. Load a few heavy shoes on each shelf and watch for sagging or movement. If anything shifts, double-check your stud attachment. Sagging usually means you’re relying on drywall anchors where studs were missed.
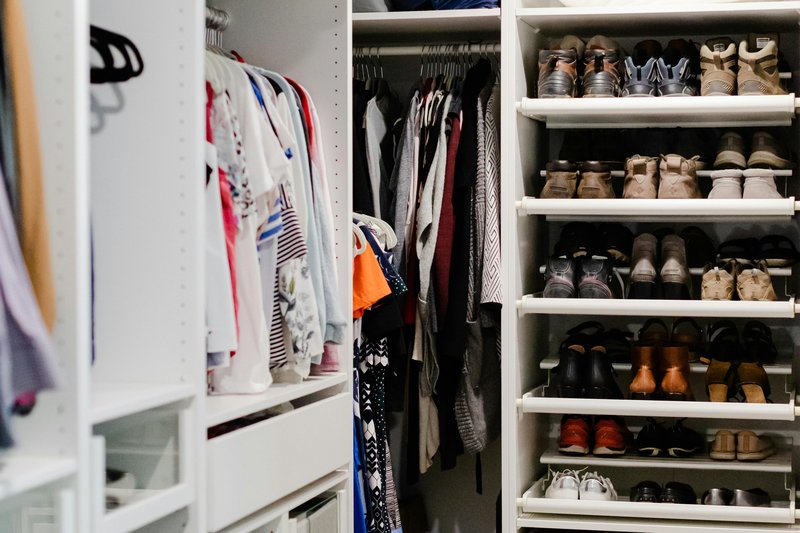
Shoe Display Styles: Angled vs. Flat Shelves
The angle of your shelves makes a big difference in how your collection looks and functions. Here’s when to choose each:
Angled shelves tilt shoes slightly forward, showing off the toe design and brand markings. They’re ideal for sneakerheads who want each pair to be visible from across the room. The downside: they use more vertical space per shelf, so you’ll fit fewer rows. Angled shelves also require a lip or stop at the front edge so shoes don’t slide off. I use a 15-degree angle for most sneakersâit’s enough tilt to see the shoe but shallow enough to stack multiple rows.
Flat shelves are straightforward and work for everything from loafers to heels to boots. They maximize storage density because you can stack shoes flat or side by side. They’re easier to clean and less prone to dust collection. The tradeoff: visibility is lower, especially on lower shelves. If your collection is more about practicality than display, flat shelves are the way to go.
For maximum versatility, build a mix of both. Upper shelves angled for display, lower shelves flat for everyday wear.
Lighting Your Shoe Display Wall
Good lighting can turn a functional storage wall into a nice display feature. You don’t need to rewire your homeâLED strip lights are easy to install and affordable.
I prefer battery-operated puck lights placed under each shelf for a uniform glow. They’re simple to mount with adhesive backing and last months between battery changes. For a more polished look, hardwired LED strips with a remote dimmer give you total control. Route the wires behind the wall or use cord covers to keep it clean.
Warm white (2700K-3000K) highlights leather and suede without washing out colors. Cool white (4000K+) works better for bright sneaker colors. Stick to one temperature across the whole wall to avoid a mismatched look.
Common Mistakes to Avoid
After building several of these walls, I’ve seen the same mistakes repeat. Save yourself the frustration.
- Skipping studs. The number one reason shelves crash. Always anchor to studs for anything over 20 pounds. If your studs are spaced oddly, use a cleat system to distribute weight.
- Using weak brackets. Those plastic or thin metal brackets from discount stores won’t hold a collection. Invest in heavy-duty brackets rated for 100 pounds or more. For strong support, consider heavy-duty shelving brackets that can handle the weight.
- Overloading shelves. Just because a bracket says it holds 100 pounds doesn’t mean a single shelf can support that load evenly. Spread heavy items across multiple shelves.
- Poor spacing. Crowding shelves makes it hard to grab shoes. Leave at least 2 inches of breathing room between pairs. Nothing ruins a display faster than shoes wedged in like sardines.
- Ignoring floor clearance. If the bottom shelf is too low, you’ll be bending uncomfortably to grab shoes. Keep it at least 6 inches off the ground for cleaning access.
Custom Add-Ons: Benches, Drawers, and Accessories
Once the shelves are up, think about extras that make the setup more functional.
A small bench or seating area nearby can turn the wall into a dressing station. Even a compact stool or a fold-down bench saves you from sitting on the floor to tie laces. Under the lowest shelf, add a hidden drawer or two for shoe polish, brushes, and extra laces. It keeps accessories tidy without cluttering the display.
Decorative molding around the edges or a back panel with LED backlighting gives the wall a built-in custom look. If you think you might expand later, leave extra room on the ends or plan for modular brackets that let you add shelves easily.
Budget Breakdown: What to Expect
Here’s what a typical diy shoe wall display costs when you do it yourself versus hiring a custom woodworker:
- DIY (materials only): $100-$300 for a small wall (6-8 shelves)
- DIY with premium materials: $300-$600 for a larger wall (12+ shelves) with hardwood and metal brackets
- Custom-built by a carpenter: $600-$1,500+ depending on complexity and finish
You can save money by using stock lumber from a home center instead of custom-cut pieces. Pre-finished shelves cost more per linear foot but save time on sanding and painting. Buy brackets in bulk packsâthey’re usually cheaper per unit. And don’t forget fasteners: screws, anchors, and leveling shims add up to about $15-20.
If you’re on a tight budget, start with a single shelf section and expand over time. That’s how most successful projects begin anyway.
. For more ideas, check out The Best Closet Shoe Racks for Large Collections.
Conclusion: Is a DIY Shoe Wall Right for You?
If you’re tired of tripping over shoes and want a storage solution that actually showcases your collection, a diy shoe wall display is one of the more satisfying projects you can tackle. It’s practical, customizable, and relatively simple with the right planning. You don’t need to be a master woodworkerâjust willing to measure twice and anchor properly. Once you see your shoes organized and lit, you’ll wonder why you didn’t do it sooner. Ready to get started? Find your options here and plan your wall today.
Learn how to build a custom shoe display wall with this practical DIY guide. From planning to installation, get expert tips for a stunning, organized showcase.
Learn how to build a custom shoe display wall with this practical DIY guide. From planning to installation, get expert tips for a stunning, organized showcase.