How to Maximize Corner Space in a Walk-In Closet
-
- 77
Introduction
If youâre planning a walk-in closet, corners are often the tricky spots. They seem to swallow up space without offering much in return. Most people end up with a pile of shoes, a forgotten gym bag, or just empty air where a perfectly usable storage area should be. Thatâs where smart corner closet storage comes in.
Over the years, I’ve helped homeowners and DIYers turn those dead zones into some of the most functional parts of their closets. This isnât about magazine-level perfectionâitâs about results that make your mornings easier. In this guide, Iâll walk you through measuring your space, choosing the right products (shelving, lazy Susans, hanging rods, and pull-outs), installation tips that actually save time, and the common mistakes to avoid. Whether youâre a weekend warrior or working with a contractor, youâll leave with a clear plan of action.
. If you’re interested in related upgrades, see our guide to How to Design a Hollywood Regency Walk-In Closet:.
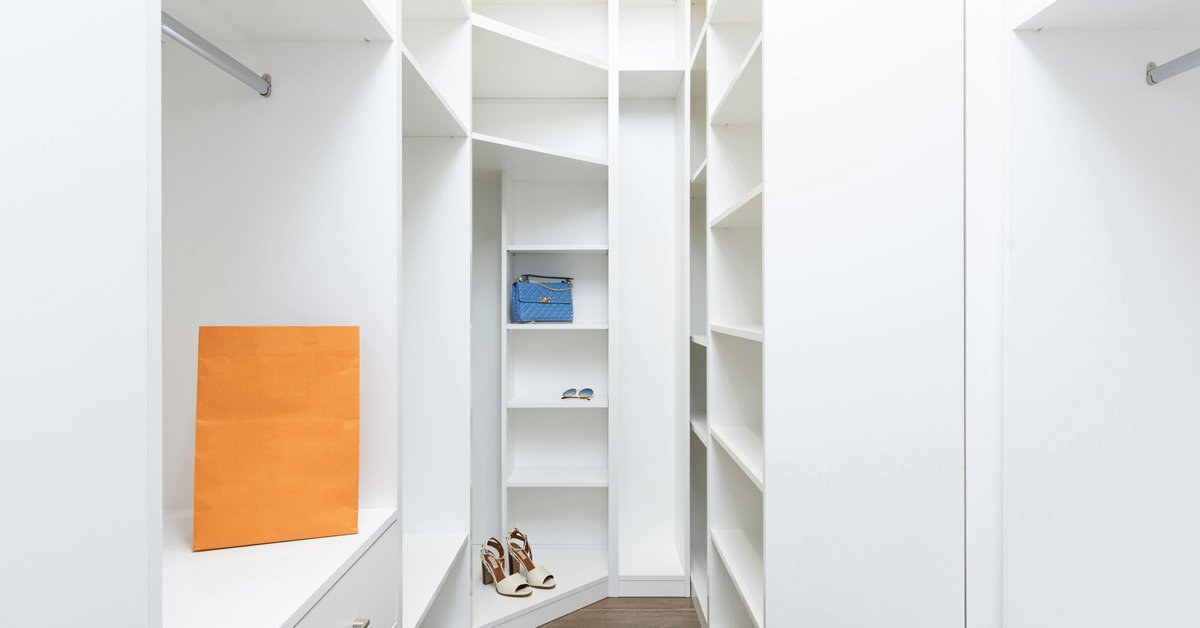
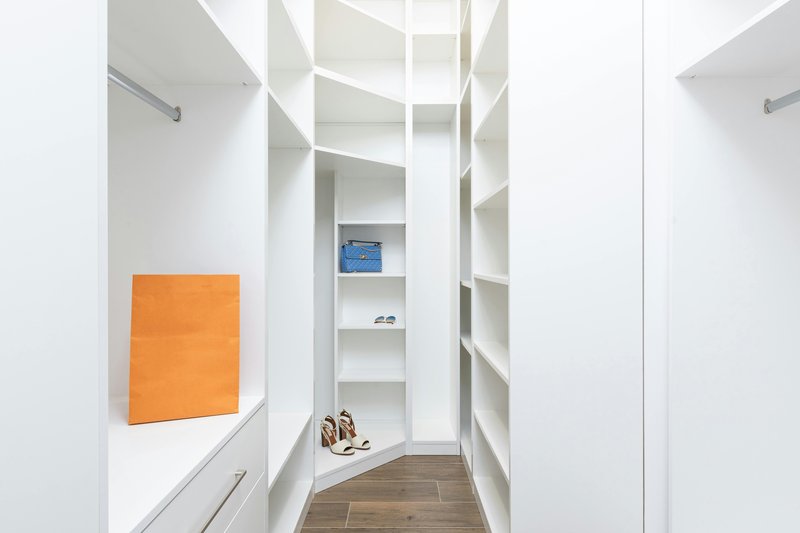
Why Corner Storage Is a Common Pain Point
Let me start with something Iâve seen in nearly every closet Iâve worked on: corners become black holes. It doesnât matter if the closet is a sprawling walk-in or a compact reach-inâthe deeper you go into a corner, the harder it is to reach anything. Thatâs because standard rectangular shelves and rods arenât designed for angles. They leave a triangular void at the back thatâs too deep for daily use.
You end up shoving things like off-season sweaters, old belts, or boxes youâll never open into the corner. Itâs not lazinessâitâs bad design. Without a plan, corners encourage dumping, not organizing. That wasted square footage adds up in a typical walk-in closet with two or three corners. Travelers who need to store seasonal gear in limited space may benefit from corner shelf kits designed for flexible storage.
The fix is intentionality. Treat corners as their own design zone, not as an afterthought. Once you do, they can hold as muchâif not moreâthan a straight run of shelving.
Measuring Your Corner: Key Dimensions to Consider
Before you buy anything, measure carefully. Iâve seen people order the wrong lazy Susan diameter or install shelves that are too shallow because they didnât account for trim or baseboards. Take the time to do this right.
Hereâs what you need to measure:
- Depth: Measure from the wall corner to where you want the shelf or rod to end. For most walk-in closets, this is 12 to 24 inches. Measure both walls, because they might not be identical.
- Height: Floor to ceiling. If youâre installing multiple shelves, plan the spacing. Also note any light fixtures, vents, or crown molding that could interfere.
- Angle: Most corners are 90 degrees, but old houses or custom builds can have odd angles. Use a combination square or an angle finder to confirm. A 92-degree corner might not work with a standard pie-cut lazy Susan.
- Swing clearance: If youâre adding doors or a pull-out drawer, you need room for them to open fully. Test this with a tape measure or a cardboard mockup.
A common mistake is forgetting about the baseboard. If your corner has quarter-round or cove molding, your shelf brackets might not sit flush against the wall. Youâll need a spacer or a different bracket style. Write all these numbers down before you shop.
Corner Shelving: Simple and Effective
Corner shelving is the most straightforward solution. It works in almost any closet, requires minimal complex hardware, and can be installed in an afternoon. what matters is choosing the right type for your needs.
Iâve installed both fixed and adjustable corner shelves. Fixed shelves are strong and look clean, but youâre locked into a single configuration. Adjustable shelves give you flexibility for items of different heightsâlike boots, handbags, or folded jeans. For most homeowners, adjustable is the better call.
for materials, you have two main choices: wood or wire. Wood shelves (MDF or solid pine) look premium and hold heavier items, but they can be harder to cut for odd angles. Wire shelves are lighter, easier to cut, and allow airflow, but they donât support as much weight. I lean toward wood for closets where aesthetics matter, and wire for utility closets where function is the priority.
From experience: always use a stud finder. Corner shelves need solid anchoring because the leverage from stored items can pull them down. If you canât hit a stud, use heavy-duty toggle bolts rated for at least 50 pounds per bracket. Level each shelf as you goâone wobbly shelf will throw off the whole look. Space shelves about 10 to 14 inches apart for general storage, or 12 to 16 inches for tall boots.
For a quick win, I recommend adjustable chrome shelving kits from Amazon. Those dealing with limited depth may find corner shelf brackets that allow for custom spacing a practical solution. Theyâre affordable, easy to install, and you can mix and match sizes. Look for kits that include corner-specific brackets and wall anchors.
Lazy Susans and Carousels: Rotating Solutions
If you want to maximize a deep corner cabinet or floor-level space, a lazy Susan is your best friend. These rotating units let you access items from any angle, turning that dead corner into a fully usable area. But not all lazy Susans are created equal.
There are three main designs: full-circle (360 degrees), half-moon (180 degrees), and pie-cut units that fit neatly into a corner cabinet. Full-circle units offer the most storage but require more clearance on both sides. Half-moon units are easier to install in smaller spaces but leave a gap at the back. Pie-cut units are purpose-built for corner cabinets and look the most integrated.
In my experience, lazy Susans are best for lighter itemsâlike scarves, belts, small handbags, or accessory bins. Heavy bins or shoes tend to make the unit hard to spin, and constant rotation can wear out the bearing over time. If you plan on storing heavier items, go with a steel ball-bearing unit instead of a plastic one.
Measurement is critical here. You need to know the exact diameter of the cabinet or corner space. Most lazy Susan kits work with 24-inch, 28-inch, or 32-inch diameters. Leave at least 1 inch of clearance on all sides for smooth rotation. Installation can be finickyâyou have to center the bearing plate perfectly, or the shelves will wobble. I always use a level and a center-finding tool.
For a reliable option, I use Rev-A-Shelf lazy Susan kits or heavy-duty ball-bearing lazy Susan hardware from Amazon. Beginners may want to start with a ball-bearing lazy Susan that handles moderate weight without sacrificing rotation ease. They hold up well even in daily use.

. For more ideas, check out How to Measure Your Space for a Walk-In Closet: A.
Corner Hanging Rods: What Works and What Doesnât
A straight rod across a corner creates a diagonal hanging space, but itâs often inefficient. The rod is long, but the usable hanging area is limited to the center, and items at the ends get crushed or hard to reach. Iâve seen plenty of closets where people try this and then stuff the ends with off-season coats they never wear.
The better solutions are curved rods, angled rods, or offset rods. Curved rods follow the corner arc, allowing you to hang clothes all the way across without wasted space. Angled rods create a gradual bend that works well in deeper corners. Offset rods move the rod forward so itâs easier to reach.
I recommend double hanging in cornersâtwo rods stacked verticallyâif you have at least 7 feet of ceiling height. That gives you a top rod for shirts and a bottom rod for pants or skirts. Itâs a huge space saver. Single hanging works best for longer items like dresses or coats, but make sure you can actually reach the far end.
A common mistake: putting the rod too deep into the corner. I once installed a curved rod 18 inches from the corner, and I could barely grab a hanger without leaning in. Keep the rod at least 10 inches from the back wall for comfortable access. Use heavy-duty curved closet rods or adjustable corner rod kits to get the right fit. Frequent users may benefit from a curved closet rod system that maximizes hanging space at different heights.
Corner Drawers and Pull-Out Systems
For the deepest, most awkward corners, pull-out drawers are the ultimate solution. They transform a dead space into a functional storage zone for small items like socks, ties, jewelry, or folded T-shirts. The trick is choosing a system that maximizes depth without creating a hard-to-reach area.
You have two main options: base pull-outs (which sit on the floor or in a cabinet base) and diagonal drawers (angled to fit the corner). Base pull-outs are simpler to install and can be made from wire baskets or solid wood drawers. Diagonal drawers look more custom but require precise cutting and strong drawer slides.
Installation requires full-extension slides. Without them, youâll lose access to the back of the drawer, defeating the purpose. You also need false frontsâa decorative panel that hides the hardwareâto match the rest of your closet. Pre-assembled corner drawer units are available, but Iâve found DIY kits are more flexible for odd dimensions. Youâll need a drill, a jigsaw, and patience.
These systems are best for items you use regularly. Donât store bulky sweaters or heavy toolsâtheyâll strain the slides. I use corner pull-out drawer kits from Amazon that include slides, brackets, and mounting hardware. Look for ones rated for at least 75 pounds. For a smooth installation, a heavy-duty drawer slide set can ensure reliable access over time.
Corner Shelving vs. Lazy Susan vs. Pull-Out: Which Is Best for You?
Choosing the right corner storage system comes down to three factors: your budget, the depth of your space, and what youâre storing. Hereâs a quick breakdown to help you decide.
- Corner Shelving: Best for shallow corners (12â18 inches deep). Ideal for folded clothes, shoes, or decorative bins. Cost is low ($50â$150 DIY). Easy to install. Not great for deep spaces or items you need to grab quickly.
- Lazy Susan: Best for medium-depth corners (18â24 inches). Great for accessories, small handbags, or daily-use items. Cost is moderate ($100â$300). Installation is trickier, and weight capacity is limited. Avoid for heavy items.
- Pull-Out Drawers: Best for deep corners (24 inches or more). Perfect for socks, ties, jewelry, or small folded items. Cost is higher ($150â$400+). Requires more installation work but offers the best access. Use if you want a polished, custom look.
In my experience, if you have the budget and the depth, go with pull-out drawers. Theyâre the most functional. If youâre on a tight budget, shelving is the quickest win. Lazy Susans are a middle ground but require careful measurement.
| Feature | Shelving | Lazy Susan | Pull-Out |
|---|---|---|---|
| Depth | 12â18 inches | 18â24 inches | 24+ inches |
| Cost | $50â$150 | $100â$300 | $150â$400 |
| Ease of Install | Easy | Moderate | Hard |
| Best For | Folded items, shoes | Accessories, small bags | Socks, ties, jewelry |
Common Mistakes to Avoid When Installing Corner Storage
Iâve made almost every mistake in the book, so hereâs what not to do.
- Not measuring for swing clearance. I once installed a corner shelf that blocked part of a door swing. Had to move it. Always check your door arcs first.
- Ignoring corner dead zones. Even with good storage, the very back of a corner is hard to reach. Plan for itâuse bins that pull out or leave it empty.
- Overloading shelves. Corner shelves arenât standard wall shelves. The brackets see more stress from the angle. Stick to light to medium loads.
- Choosing the wrong material for humidity. If your closet is near a bathroom, wire or sealed wood is better than MDF, which can swell.
- Installing too high or low. I often see shelves at eye level that are a reach for shorter family members. Aim for a comfortable access heightâabout 54 inches for the top shelf.
Tools and Hardware Youâll Need for Installation
Before you start, gather these tools. Youâll thank me later.
- Drill with bits for pilot holes and driving screws
- Level to keep shelves straight
- Stud finder for secure anchor points
- Measuring tape and combination square
- Screwdrivers (Phillips and flathead) for final adjustments
- Safety glasses and dust mask
- Corner shelf brackets or lazy Susan bearing kits
- Wall anchors (toggle bolts for drywall, molly bolts for heavier loads)
- Jigsaw if youâre cutting custom shelves
A heavy-duty drill and bit set is worth the investment for this job. I use a 20V cordless drill from Amazon that handles everything from pilot holes to driving lag screws. To reduce hassle during installation, a reliable stud finder with wall scanning helps locate secure anchor points accurately.
Budgeting for Corner Storage Solutions
Hereâs a realistic look at costs. DIY shelving can run you $50 to $150, depending on material and size. Lazy Susans range from $100 to $300. Pull-out drawer systems are $150 to $400. Professional installation adds $200 to $500, depending on complexity.
I always advise spending more on high-use cornersâlike the one nearest your dressing areaâand saving on less accessible ones. For example, a corner near the back of the closet can take wire shelves or a budget lazy Susan. The corner you use every day deserves a quality pull-out system. Donât go cheap on hardware; it wears out fast.
Final Tips for Long-Term Functionality
The biggest lesson Iâve learned: prioritize accessibility over capacity. A corner packed to the brim but impossible to reach is worse than having less storage that you can actually use. Use bins or baskets on shelves to group small items. Test fit everything before you secure itâmock up with cardboard if needed.
Start with one corner. Get that right, and youâll have the confidence to tackle the next. The goal isnât perfectionâitâs a closet that works for you every day.
. If you’re interested in related upgrades, see our guide to His and Hers Walk-In Closet: Sharing Space.
Ready to get started? Find your options here.
Learn how to turn awkward corner space into highly functional closet storage with practical tips, product recommendations, and common mistakes to avoid.
Learn how to turn awkward corner space into highly functional closet storage with practical tips, product recommendations, and common mistakes to avoid.