Step-by-Step Built-In Closet Construction Guide
-
- 109
Introduction
Built-in closet construction is one of those projects that just feels good to finish. You take a messy storage space and turn it into something organized and functional, and it adds real value to your home. But itâs not a weekend wing-it kind of job. It takes planning, careful measuring, and a methodical approach. Iâve built several of these in my own homes and helped friends with theirs, and Iâve learned that the difference between a professional-looking result and a frustrating mess usually comes down to what you do before you pick up a saw. This guide walks through the entire process, from assessing your space to adding the finishing touches, based on whatâs actually worked for me. Whether youâre a seasoned DIYer or just a motivated homeowner planning a remodel, youâll find practical advice here to get the job done right.

Step 1: Assessing Your Space and Setting a Budget
Before you buy any lumber, understand exactly what youâre working with. Start by measuring your closet space carefully. Record the width, depth, and height of the whole area, including floor to ceiling. Note any irregularitiesâsloped ceilings, uneven floors, or corners that arenât square. Then, take a close look at the existing construction. Use a stud finder to locate wall studsâthese are your anchor points. Identify any electrical outlets, light switches, or HVAC vents that might affect your layout. Also, account for door swing clearance. A full-size door that swings inward can eat up a surprising amount of shelf space.
. If you’re interested in related upgrades, see our guide to How to Use Chalk Paint on Old Closet Organizers:.
Setting a realistic budget is just as important. For a basic reach-in closet, you can spend anywhere from $200 to $600 on materials if you do everything yourself. That includes plywood, lumber, hardware, paint, and finishing supplies. A larger walk-in will push that closer to $800 to $1,500 or more, especially if youâre adding drawers, pull-out racks, or specialized shelving. Always add 10â15% to your material estimate for wasteâmistakes happen, and offcuts are inevitable. As for hiring a pro, a custom built-in installed by a carpenter or closet company can easily run $1,500 to $5,000 or more. The decision to DIY or hire out comes down to complexity. If your closet has a tricky layout, involves moving electrical or plumbing, or requires a lot of custom millwork, youâre better off calling a professional. If itâs a straightforward rectangular space with standard dimensions, you can probably handle it yourself.
Step 2: Designing Your LayoutâWhat Works Best for Your Needs
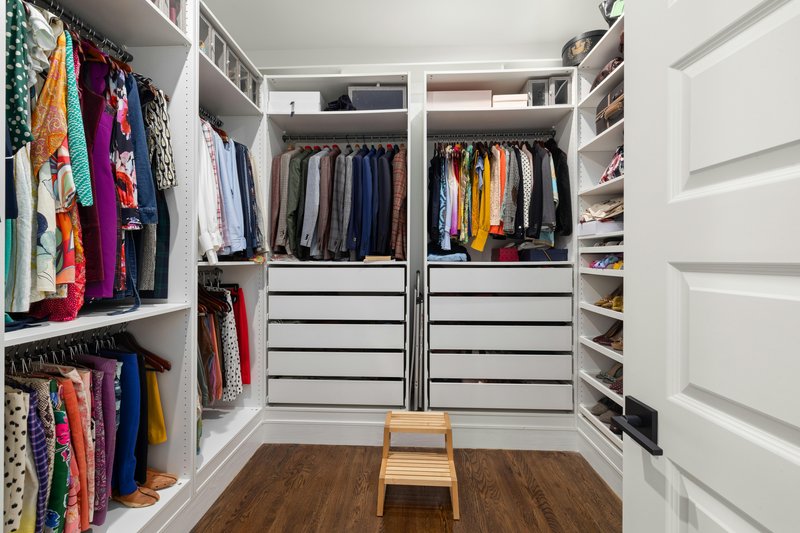
Now itâs time to think about how youâll actually use the space. For a reach-in closet (typically 4 to 8 feet wide), youâre usually limited to one main configuration: a single rod on one side with shelves above and below, or a double rod setup for shorter hanging items. For walk-ins, the possibilities expand. Standard walk-ins are at least 4 feet deep and 6 feet wide, but any shape can work. what matters is to map out how you organize your clothes. Do you hang most items? Prioritize two long hanging sections. If you fold a lot, maximize adjustable shelving. Think about shoes, accessories, and bulky items like sweaters or coats. Common configurations include a single rod at 60â66 inches for long hanging (dresses, coats), a double rod at 40â42 inches for shirts and pants, and multi-tier shelving for folded items.
Thereâs always a tradeoff between hanging space and shelving. More hanging rods mean less shelf space, and vice versa. A good rule of thumb is to measure your average garment length and plan accordingly. Also, leave enough clearance for drawers and doors to open fully without hitting anything. Sketching out your layout on graph paper or using simple design software like SketchUp forces you to think through the dimensions and see potential issues before you cut wood. And donât forget to account for the thickness of your materialsâ¾-inch plywood components take up space.
Step 3: Essential Tools and Materials for Built-In Closet Construction
Having the right tools makes this project a lot smoother. You donât need a full cabinet shop, but you do need quality basics. For measuring, a reliable tape measure and a 6-foot level are essential. A good stud finder is criticalâskip this step and you risk shelves pulling out of drywall. Iâve had good results with electronic models that also detect live wires. For cutting, a circular saw with a fine-tooth blade is the most flexible option, but a miter saw is great for clean crosscuts on lumber. If you can, a track saw is even better for long, straight cuts on plywood. Youâll also need a drill/driver with a clutch, a square, clamps, and a hammer.
Materials-wise, start with ¾-inch plywood for shelves, side panels, and drawer boxes. Baltic birch or furniture-grade plywood is worth the extra cost for its smooth surface and stability. Use 2×4 lumber for base frames and cleats if you need to level an uneven floor. For shelf supports, metal shelf brackets adjustable to 12 or 16 inches work well. Pre-finished melamine panels are an option if you want to skip painting, but they can chip and are harder to repair. Youâll also need screws (1 ½-inch and 2 ½-inch for different thicknesses), finish nails, wood filler, and primer and paint or stain. Donât forget safety gear: safety glasses, work gloves, and a dust mask for cutting wood.
tip: Spend the extra money on a stud finder with a deep scanning mode. Itâll save you from drilling into a wire or pipe and damaging your wall.
Step 4: Preparing the SpaceâClearing and Protecting
This step is straightforward but often rushed. Remove everything from the closetâclothes, shoes, boxes, and any existing rods and shelves. Pull out all hardware and brackets. If the closet has carpet, protect it with heavy-duty drop cloths or rosin paper. If itâs hardwood, use a thicker, non-slip protective covering. Next, locate and mark your wall studs with painterâs tape. Use a pencil to mark the center of each stud. If thereâs any live electrical wiring in the walls, note its location. If youâre opening up a cavity, be prepared for surprises like old wiring, insulation, or drywall patches. Take photos of anything unusual before you start building. The cleaner and more organized your workspace, the fewer headaches youâll have later.

. For more ideas, check out How to Measure Your Space for a Walk-In Closet: A.
Step 5: Framing and Building the Base Structure
This is where the project really takes shape. Start by installing a cleatâa horizontal 2×4 secured to the wall studs at the height where your bottom shelf will sit. This gives you a solid, level reference point. Then, build a base frame on the floor to lift your entire structure off the ground, especially if the floor isnât perfectly level. Use pressure-treated lumber if the closet is in a basement or on a concrete slab to avoid moisture issues. Attach vertical supports (2x4s or ¾-inch plywood strips) directly into the wall studs using 2 ½-inch screws. Check for plumb with your level at each vertical corner.
Common mistakes here include not checking for level across the entire length of the closet, skipping studs for fastening, and overtightening screws, which splits the wood. If your floor is uneven, use shims between the base frame and the floor. Tap them in until the frame is perfectly level, then fasten them in place. Once the base and vertical framing are installed, double-check that everything is square by measuring diagonalsâthey should be equal. This is your foundation; any error here will compound in later steps.
Step 6: Cutting and Installing Shelves and Hanging Rods
With the framing in place, youâre ready for the visible components. Measure each shelf location carefully. Cut your plywood or melamine shelves to length. For a snug fit, subtract about â inch from the width to allow for easy insertion and expansion. Install shelf supports every 24 inches at minimum. For heavy items like jeans or luggage, 16-inch spacing is safer. Standard screws into the studs or vertical supports work well.
For hanging rods, the ideal height is 60â66 inches for long hanging (coats, dresses) and 40â42 inches for double rods (shirts, pants). Rods should be mounted into studs or with heavy-duty rod brackets that anchor into the studs. Closet rod kits are available and include brackets and a sturdy metal or wood rod. For a more custom look, use a solid hardwood rod and flange brackets. Avoid flimsy wire racks for rods, especially if you hang heavy items. Adjustable shelvesâwhere the shelf rests on peg-style supports that fit into predrilled holesâoffer flexibility. Fixed shelves are more stable and often look cleaner but are harder to change later. For most closets, a mix works best: fixed for bottom and base shelves, adjustable above hanging rods.
Step 7: Adding Drawers, Doors, and Finishing Touches
Drawers add a level of organization that shelves canât match. You can buy pre-made drawer boxes in standard sizes from home centers or build your own from ½-inch or ¾-inch plywood. Pre-made boxes save time and are usually accurate. If you build your own, use pocket hole joinery or dovetail jigs for strength. Install drawer slidesâfull-extension slides are worth the small premium because they let you see the entire drawer. For doors, consider whether you want them. Interior doors can be sliding, bi-fold, or standard swing. If the closet is in a bedroom, you might want doors to hide the clutter. If itâs a reach-in, a simple bi-fold or sliding door is practical. Open shelving is also popular in modern designs. For finishing, sand all exposed plywood edges smooth. Apply a coat of primer and two coats of paint or a clear coat. Fill nail holes with wood filler before painting. Pre-finished melamine panels eliminate this step entirely, which saves a lot of time if you want a quick, durable finish.
Ready to get started? For drawer slides, shelf brackets, and closet rod kits, check out reliable options that fit your project.
Avoid These 5 Common Mistakes in Built-In Closet Construction
- Not accounting for door swing clearance. If your closet door swings inward, youâll lose usable space and may hit shelves or rods. Always measure the door swing and plan accordingly, or consider a pocket or sliding door.
- Using incorrect shelf thickness. ½-inch shelving looks thin and can bow under weight. Stick with ¾-inch plywood or MDF for stability. Itâs a small price for a much sturdier result.
- Ignoring level across the whole unit. A single slightly unlevel shelf may not matter, but if the entire framing is off, youâll struggle with doors, drawers, and a finished look. Check level at every major stage.
- Failing to seal edges on raw plywood. Raw plywood edges look unfinished and can fray. Use edge banding, a router with a flush trim bit, or simply prime and paint them well.
- Underestimating time. A built-in closet project always takes longer than you plan. Add 50% to your time estimate to avoid frustration. Rushing leads to mistakes.
Tools vs. Pre-Fab Kits: Which Is Right for Your Project?
Not every project requires building from scratch. If youâre working with a standard-size closet and want a quicker, less complex solution, consider a modular pre-fab closet system. These kits come with predrilled panels, brackets, and rods, and require only basic tools for assembly. Theyâre less expensive than fully custom work, but they typically offer less flexibility for odd dimensions or unique layouts. Custom built-in construction, on the other hand, gives you total control over sizing, materials, and design. Itâs ideal for awkward spaces like eaves, slanted walls, or small alcoves. The cost difference can be significantâa basic pre-fab system might run $200 to $600, while building from scratch with plywood and lumber can be similar or slightly higher, but with superior results. If you value speed and simplicity, a kit is a solid choice. If you want something tailored to your exact space and needs, custom is the way to go. For those leaning toward a kit, look for a quality system with sturdy components and positive reviews.
Final Checklist Before You Declare Your Built-In Finished
- Check that all vertical supports are plumb and all shelves are level.
- Verify all screws are flush with the surfaceâcountersink them if necessary.
- Test all drawers to ensure they open and close smoothly without rubbing.
- Check all doors for proper alignment and swing clearance.
- Inspect all edges for sharp cornersâsand down any rough spots.
- Clean up all dust and debris from the closet space.
- Apply final touch-up paint or clear coat to any areas that got scratched or scuffed during installation.
A thorough run-through now ensures your closet looks professional and functions well for years.
. For more ideas, check out How to Design a Hollywood Regency Walk-In Closet:.
Ready to Build Your Built-In Closet?
Building a built-in closet is a project that delivers immediate, daily satisfaction. From more organized morning routines to a bedroom that feels cleaner and more spacious, the payoff is huge. Youâve got the plan, the steps, and the practical guidance. Now itâs a matter of gathering your materials and getting to work. If youâre ready to start, the right tools and high-quality materials make all the difference. Find your options here and get building with confidence.
Learn how to plan, build, and finish a custom built-in closet. This step-by-step guide covers tools, materials, framing, shelving, and pro tips.
Learn how to plan, build, and finish a custom built-in closet. This step-by-step guide covers tools, materials, framing, shelving, and pro tips.