How to Build an Industrial Walk-In Closet with Exposed Pipes and Raw Wood
-
- 118
Introduction
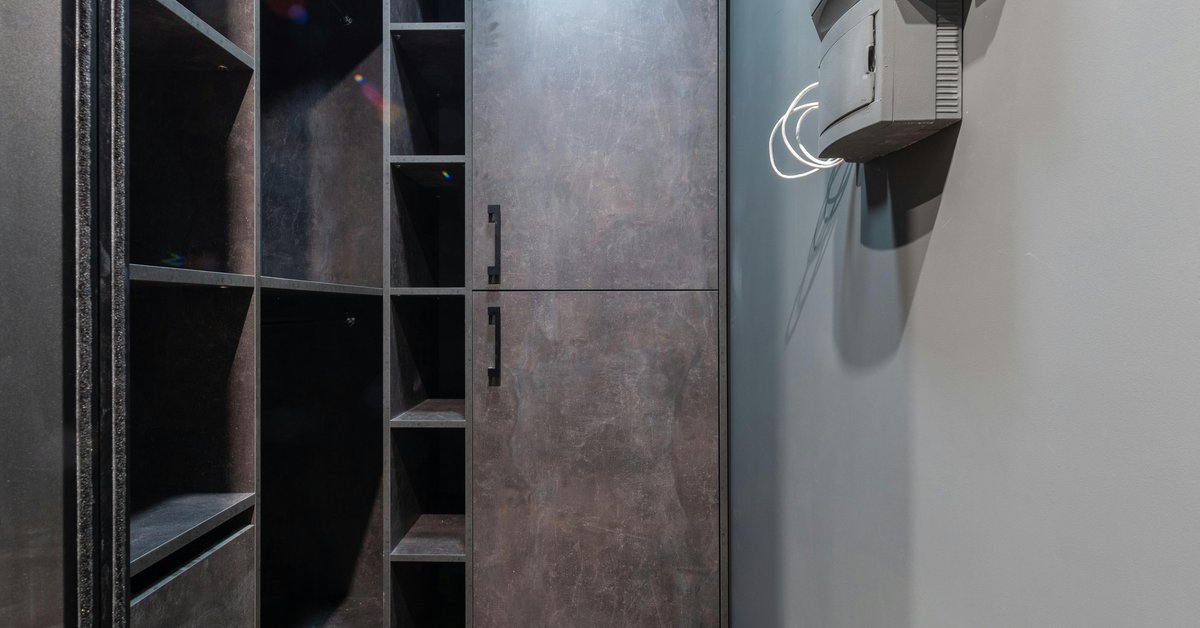
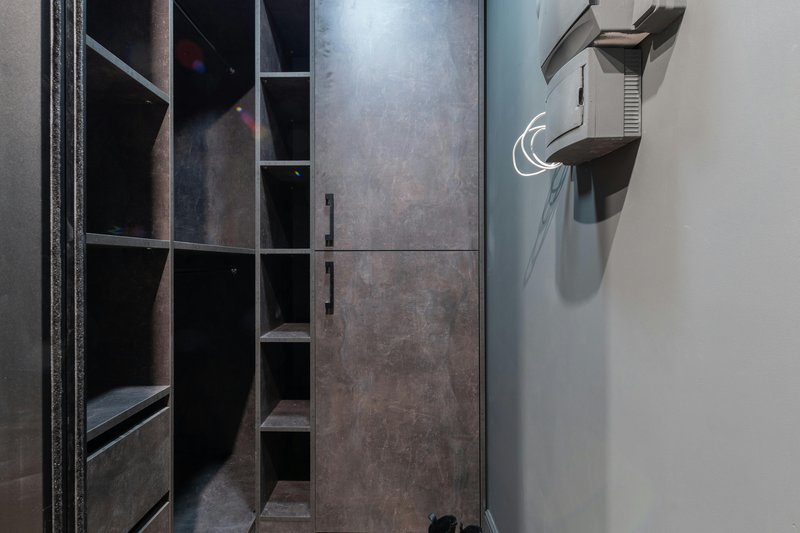
An industrial walk-in closet uses exposed pipes and raw wood to create a space that is both functional and visually striking. Instead of hiding the infrastructure, you put it on display. This approach works well for homeowners who appreciate a raw, utilitarian aesthetic but still need serious organization. It’s not about polished luxury. It’s about building a system that is durable, easy to modify, and far less expensive than custom cabinetry. If you have ever looked at a row of black iron pipes and thought they would make better hanging rods than a wooden dowel, this style is for you. This article covers the practical side of designing and building an industrial walk-in closet: choosing materials, planning the layout, installing everything correctly, and avoiding the common mistakes that can turn a cool idea into a frustrating project.
Why Industrial Style Works for Walk-In Closets
Industrial design isn’t a passing fad. It’s a practical response to the space you have. In a walk-in closet, you need durability, flexibility, and cost control. Exposed pipes and raw wood deliver on all three. Black iron and steel pipes handle heavy winter coats and stacks of denim without sagging. Raw wood shelves, especially thicker boards like 3/4-inch plywood or solid oak, keep folded items in place and show less wear than painted particleboard.
. For more ideas, check out 12 Contemporary Walk-In Closet Trends for.
Another advantage is customization. With pipes and flanges, you can build a hanging system that matches your exact wall dimensions. You aren’t stuck with standard rod lengths. If you have a narrow wall, you cut a pipe to fit. If you have a high ceiling, you run vertical pipes from floor to ceiling and mount shelves between them. This flexibility keeps costs down because you are buying raw materials and assembling them yourself, not paying for custom millwork.
Exposed pipes also serve a dual purpose. They provide the structural support and the visual anchor. You don’t need to add decorative trim or molding. The pipes are the design. This simplifies the build. You focus on function, and the aesthetics fall into place.
Choosing the Right Exposed Pipes for Your Closet
The pipe material you pick affects both the look and the load capacity. There are three common options: black iron, galvanized steel, and copper. Each has its tradeoffs.
- Black iron is the most popular choice for an industrial look. It has a dark, matte finish that pairs well with raw wood and concrete floors. It is strong, cheap, and easy to find at hardware stores. The downside is that it can rust in humid environments, so skip it for basements or rooms without good ventilation.
- Galvanized steel has a shiny, silver appearance. It resists moisture better than black iron, making it a good fit for closets near bathrooms or in damp climates. The finish is brighter, which can feel less warm than black iron, but it works well with light-colored wood.
- Copper is expensive and softer. While it looks beautiful, it isn’t great for heavy hanging rods. Copper bends under constant load and is better suited for decorative accents or lightweight shelving.
For a true industrial closet, black iron offers the best balance of cost and strength. You can find pre-cut pipes in standard lengths at home centers, but for odd-sized spaces, a pipe cutter lets you cut custom lengths. Always use flanges to secure pipes to the wall or ceiling. Flanges distribute weight and prevent the pipe from pulling out of the fitting. For hanging rods, 1/2-inch schedule 40 pipe is sufficient for most clothing. If you plan to store heavy coats or bulkier items, step up to 3/4-inch pipe. When sourcing materials, look for pipe fitting kits or individual flanges and connectors on Amazon or at a local hardware store. If you are buying online, check the weight rating on flanges to be sure they will hold your expected load.
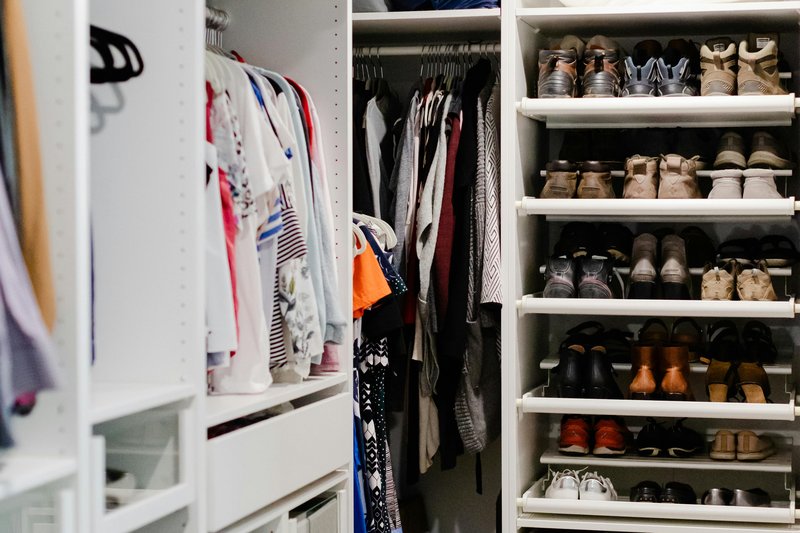
Selecting Raw Wood: Species, Finish, and Moisture Resistance
Raw wood is the counterbalance to the industrial pipes. It adds warmth and texture. The choice of wood affects durability, appearance, and cost.
Reclaimed barn wood is a favorite for the industrial look. It has weathered grain, nail holes, and a patina you can’t get from new wood. It is also more expensive and harder to find. If you want the reclaimed look without the price, consider new pine boards that have been distressed with chains or sanded heavily. Pine is soft and lightweight, which makes it easy to cut and hang, but it dents easily. It works fine for shelves that hold light items like t-shirts or folded sweaters. Oak is much harder and more expensive. It is worth the investment if you have heavy storage needs or want shelves that will last decades. Plywood is the budget-friendly option. Use 3/4-inch birch plywood with a sanded face. It is strong, stable, and takes stain or oil well. Avoid particleboard or MDF; they sag under weight and swell if exposed to moisture.
Thickness matters. Shelves need to be at least 3/4-inch thick. For spans over three feet without center support, go with 1-inch thick or add a bracket midway. Raw wood can be left unfinished for a matte, dry feel, but sealing is recommended in any space with humidity swings. A coat of tung oil or a clear polyurethane protects the wood without hiding its character. If you skip sealing, the wood may warp or develop mildew over time. For a budget option, use a wood conditioner or a paste wax. Reapply once a year to maintain the finish.
Layout Planning: Where to Place Pipes and Shelves
Before you buy materials, measure your space and plan the layout. Walk-in closets vary in shape, but a few rules apply everywhere.
Rod height depends on what you hang. For shirts and jackets, a single rod at 40 to 42 inches from the floor is standard. For dresses or long coats, go to 60 inches. If you have high ceilings, consider a double rod system: one at 40 inches for shirts and one at 80 inches for long items. Leave at least 12 inches between rods for easy access. Shelf depth should be 16 to 18 inches for folded items. Deeper shelves make it hard to reach the back, and shallower ones don’t hold much. For shoes, bins, or accessories, keep shelves at 12 to 14 inches deep.
Exposed pipes replace traditional wooden rods, but they can also serve as structural supports for shelves. Run a vertical pipe from floor to ceiling, attach flanges at both ends, and then mount horizontal shelves on brackets attached to the vertical pipe. This creates a modular system that can be adjusted later. If you want a simpler approach, mount horizontal pipes directly to wall studs using flanges. Space the pipes 24 to 30 inches apart for stability.
A common decision framework: If you have high ceilings, use vertical pipes as supports for upper shelves. If your closet has odd angles or sloped ceilings, use adjustable flanges that allow you to angle pipes to follow the roofline. If you have limited wall space, prioritize hanging rods over shelves and use bins on the floor for folded items.
Tools and Materials You Will Need
Here is a straightforward list of what you need to complete the job. Buy the tools first, then the materials based on your measurements.
Tools:
- Pipe cutter (a ratcheting cutter costs around $20 and makes clean cuts)
- Drill with a set of drill bits for masonry or wood, depending on your walls
- Stud finder (a magnetic one is cheap and reliable)
- Level (a 4-foot level is ideal for long spans)
- Measuring tape
- Safety glasses and work gloves
- Sandpaper (120 and 220 grit for smoothing wood edges)
Materials:
. For more ideas, check out How to Design a Hollywood Regency Walk-In Closet:.
- Black iron pipes in your chosen lengths (buy extra for mistakes)
- Flanges (at least one per pipe end, plus spares)
- Lag bolts or heavy-duty wall anchors for mounting flanges
- Wood boards for shelves (3/4-inch plywood or solid wood)
- Wood screws or shelf brackets for attaching shelves to pipes or walls
- Wood glue (optional, for reinforcing joints)
- Pipe thread sealant (optional, but prevents leaks if you ever use the pipes for another purpose)
Approximate costs: Pipes run $5 to $15 per foot depending on diameter. Flanges are $3 to $8 each. Wood can range from $30 for a sheet of plywood to $100 for solid oak boards. A basic pipe cutter kit costs around $20 to $30 on Amazon. Heavy-duty shelf brackets are another $10 to $20 for a set of four. If you are on a tight budget, start with plywood and black iron pipes. That combination delivers the look without breaking the bank.
Step-by-Step Installation Guide
Follow these steps in order for a solid installation.
Step 1: Mark wall studs and plan pipe locations. Use a stud finder to locate studs in the walls where you will mount pipes. Mark them with a pencil. Decide on the height for your hanging rods and shelves. For a double rod system, mark two heights. For single rods, one mark is enough. Use a level to draw horizontal lines at those heights across the walls.
Step 2: Cut pipes to length and assemble with flanges. Measure the distance between studs or the width of your shelf area. Cut pipes using the pipe cutter. Twist the cutter around the pipe, tightening it every rotation until the pipe snaps. Wear gloves; the cut edges are sharp. Screw flanges onto each end of the pipe. For a more secure connection, use pipe thread sealant on the threads.
Step 3: Mount pipe supports to studs. Hold the pipe assembly against the wall with the flanges aligned to your marked studs. Drill pilot holes through the flange holes into the studs. Use lag bolts that are long enough to go at least 1.5 inches into the stud. Tighten with a socket wrench or drill. Don’t overtighten; you can strip the threads.
Step 4: Cut wood shelves to size and sand edges. Measure the space between the pipe supports or between walls. Cut the wood to fit. If you are using plywood, cut it with a circular saw and a straight edge guide. Sand all edges with 120 grit sandpaper, then follow with 220 grit for a smooth finish. Wipe off dust.
Step 5: Attach shelves to pipe supports or use separate brackets. If your pipes are mounted horizontally, you can place shelves directly on top of them. For a more secure fit, screw the shelves to the flanges or use L-brackets that attach to the wall. If you used vertical pipes, attach shelf brackets to the pipe using pipe clamps or U-bolts. Make sure the shelves are level before tightening.
Step 6: Hang clothes and test weight. Start with lighter items and gradually add heavier pieces. Check that all flanges and lag bolts are tight. After a week, recheck the fasteners. Wood can compress over time, so tightening is normal.
Safety note: Always wear gloves when handling cut pipe edges. The burrs can cut deeply. If you are drilling into tile or concrete walls, use a masonry bit and slow speed.
Lighting and Accessories to Enhance the Industrial Feel
Good lighting is essential in a walk-in closet, but it can also reinforce the industrial aesthetic. Pendant lights with metal shades or exposed Edison bulbs work well. Choose a warm color temperature around 2700K to keep the space from feeling cold. Track lighting with black or brushed nickel fixtures is another option. It lets you direct light to specific areas like shelves or a dressing mirror. Install dimmers so you can lower the light for a moodier feel or brighten it when choosing outfits.
Accessories should be kept minimal to preserve the raw look. Wire baskets or metal bins are good for organizing accessories, belts, or scarves. They match the industrial theme without adding visual clutter. Hooks made from pipe fittings or black steel are functional and inexpensive. Avoid plastic storage containers or decorative items that clash with the material palette. Stick to metal and wood. If you need extra organization, use clear glass jars for small items or leather straps for hanging accessories.
Common Mistakes When Building an Industrial Closet
These are the mistakes I have seen most often, and they are easy to avoid with a little planning.
- Using pipes that are too thin. A 1/2-inch pipe can hold a good amount of clothing, but if you overload it with heavy coats or jeans, it can bend over time. Use 3/4-inch for heavy loads or reinforce the pipe with a center support bracket.
- Forgetting to seal raw wood in damp climates. If your closet is in a basement or a humid area, unsealed wood absorbs moisture and warps. At minimum, apply a coat of polyurethane or tung oil. Reapply annually.
- Mounting to drywall without studs. Flanges and pipes are heavy. If you attach them to drywall alone, they will pull out. Use lag bolts into studs. If studs are not where you need them, install a piece of plywood across the studs first and mount the pipes to that.
- Overcrowding shelves. The industrial look thrives on open space and clear lines. If you pack every shelf with bins and boxes, the room starts to look messy. Leave some shelves partially empty or use matching baskets to keep the visual weight balanced.
- Skipping the level. Pipes that are not level cause shelves to slant and clothing to slide. It also looks unprofessional. Use a level at every step.
Industrial vs. Other Closet Styles: When to Choose This Approach
Industrial isn’t the right choice for every closet. Compare it to other common styles to see if it fits your situation.
- Minimalist closets use clean lines, hidden hardware, and neutral colors. They are more expensive because they require custom cabinetry or high-end shelving. Industrial is cheaper and more hands-on, but it isn’t as sleek. Choose minimalist if you want a perfectly polished look and have the budget. Choose industrial if you want something rugged and flexible.
- Farmhouse closets use shiplap, beadboard, and painted wood. They are warmer but less durable. Industrial is stronger and can handle heavier loads. If you prefer painted surfaces and a cozy feel, go farmhouse. If you want exposed materials and low maintenance, go industrial.
- Modern closets use lacquered finishes, glass, and integrated lighting. They are high-cost and high-maintenance. Industrial is the opposite: low cost and low fuss. If you rent or plan to move, industrial is easier to disassemble and take with you.
A quick decision matrix: If your budget is under $500 for materials, you are moderately handy, and you have open ceilings or rough textures in the room, industrial is the obvious choice. If you want a perfectly smooth, seamless look, look elsewhere.
Maintaining Your Industrial Walk-In Closet
This style requires very little maintenance, which is one of its best features. Dust the pipes every few months with a dry rag to keep them from looking dull. If you used black iron and notice rust spots, rub them with a steel wool pad and apply a thin layer of clear wax to protect the area. Raw wood that has been oiled or sealed only needs to be re-oiled every year or two. Unsealed wood can be left alone, but vacuum the dust off regularly. Check flanges and lag bolts after the first month. They can loosen as the wood settles. Tighten them if needed. That is it. No painting, no staining, no refinishing. The materials look better with a little wear.
. If you’re interested in related upgrades, see our guide to Industrial Pipe Walk-In Closet: Urban and.
Final Thoughts: Is an Industrial Walk-In Closet Right for You?
An industrial walk-in closet is a practical choice if you appreciate honest materials and don’t mind doing some of the work yourself. It is affordable, customizable, and durable. The look is forgiving of imperfections, so you don’t need to be a master carpenter to get good results. If you have a space that feels uninspired, a few lengths of pipe and some wood boards can transform it into something that feels intentional and useful. If you are ready to start your closet transformation, grab the tools and materials listed above and begin building your industrial setup.
Learn how to design an industrial walk-in closet using exposed pipes and raw wood. Practical tips, material choices, and layout ideas for a DIY-friendly makeover.
Learn how to design an industrial walk-in closet using exposed pipes and raw wood. Practical tips, material choices, and layout ideas for a DIY-friendly makeover.