Small Closet Budget: How to Get the Look for Less (A Practical Guide)
Introduction
Working with a small closet budget doesn’t mean settling for a cramped, chaotic space. Over the years, I’ve organized dozens of compact closets—some in my own homes, others for friends and clients—and the consistent takeaway is this: you don’t need a luxury renovation to get a polished, high-functioning closet. The secret is knowing exactly where to put your money and where to cut corners without sacrificing the look. This guide walks through practical, cost-conscious strategies for a small closet on a realistic budget, covering everything from measuring correctly to choosing the right storage systems and accessories.

Why Small Closets Need a Dedicated Budget
A small closet isn’t just a smaller version of a walk-in. The constraints are different, and the approach to spending should be too. The most common mistake I see is people throwing money at boutique closet systems that are over-engineered for a 4-foot reach-in. You don’t need a custom cedar-lined cabinet with pull-out tie racks when a well-placed shelf and a tension rod will do the job for a fraction of the cost.
The trap is often psychological: because the space is small, there’s a temptation to make every inch “perfect.” That perfectionism leads to overspending on expensive bins, designer hangers, or elaborate lighting. Meanwhile, the foundational elements—like a sturdy rod that doesn’t sag or shelves that actually fit—get ignored. A dedicated budget forces you to prioritize. It means deciding ahead of time: am I spending $50 on a set of durable shelves or $150 on decorative baskets that hide my mess? The answer depends on your goals, but the choice should be deliberate, not accidental.
Another trap is buying a full wire shelving system from a big-box store without measuring. That $200 kit often requires cutting and customizing, and if you’re not prepared for that, you end up with wasted pieces and a half-finished project. A small closet budget works best when it’s planned around the specific dimensions of your space, not the generic offerings in a catalog. Treat the budget as a tool, not a constraint. It helps you avoid the worst offenses: impulse purchases of trendy storage items that don’t fit or solve any real problem.
Assessing Your Small Closet: Measure First, Buy Later
The fastest way to waste a small closet budget is skipping the measuring step. I’ve done it myself—ordering a set of modular cubes based on a rough guess, only to find they left a 6-inch gap on one side. That gap then required a filler piece that was oddly sized and more expensive than the whole set. So step one: get a tape measure, a notepad, and 20 minutes.
Start with the width, depth, and height of your closet. Write down the exact dimensions of the floor, the walls, and the ceiling. Don’t forget about baseboards, light fixtures, or doors that swing inward. Small closets often have odd features: a sloped ceiling, a corner that’s not square, or a support beam. Note all of these. Next, measure the space above the existing rod—this is where a second riser rod can double your hanging space. Also measure the floor depth: if it’s less than 24 inches, standard shoe racks might not fit.
Once you have accurate measurements, decide how you want to use the space. Do you need more hanging space for shirts and dresses, or are shelves better for folded items? I recommend a digital laser measurer for awkward corners—it’s faster and more accurate than a tape. The tradeoff between DIY measurement and professional design services is about complexity. If your closet has an odd shape or you want a fully customized system, paying $150 for a designer consultation can save you from buying the wrong components. But for a standard rectangular reach-in, your own measurements plus a little research will do just fine.
The rule is simple: buy nothing until you have a full set of measurements and a rough plan. This single step prevents the most common budget-breaking errors and makes everything that follows more efficient.
Budget Breakdown: Where to Spend vs. Where to Save
Not every part of a closet deserves the same investment. Here’s a framework that has worked well for me and for others I’ve helped.
Spend on shelving and rods. These are the foundation. A solid, adjustable wire or plastic-coated shelf system from a brand like ClosetMaid or Rubbermaid costs around $100–$150 for a small closet. The key is to choose a system that’s modular and adjustable. Don’t cheap out on brackets or supports—a sagging shelf will ruin your whole layout. Spend the extra $10–$20 for heavy-duty brackets and thick rods. Check out slim velvet hangers to go with your rod—they’re durable, take up less space, and give a uniform look.
Save on decorative bins and baskets. It’s tempting to buy matching woven bins or clear acrylic containers, but these are often overpriced and don’t add real functionality. Affordable fabric bins from Target or Amazon for $5–$10 each do the same job. Choose a neutral color that blends with your wall or shelving, so the space feels unified without spending a fortune.
Spend on lighting, if you need it. A small closet with bad lighting feels smaller and harder to use. A simple battery-operated puck light or LED strip costs $15–$30 and makes a huge difference. I’ve found the best stick-on LED lights are motion-activated and last for months on a set of batteries.
Save on hangers. The difference between $10 for a pack of 30 plastic hangers and $40 for a pack of 30 velvet hangers is mostly aesthetic. For a small closet, velvet hangers are better because they’re slimmer, but you can gradually upgrade over time. Start with a pack of 20 for about $8, then add more later.
Spend on a good riser rod. A closet rod riser costs around $15–$25 and instantly doubles your hanging space. It’s one of the highest-ROI purchases for a small closet. Spend the extra few dollars for one that’s adjustable and sturdy.
Here’s a quick rule of thumb: allocate 60% of your budget to structural pieces (shelves, rods, brackets), 20% to lighting and hardware, and 20% to accessories and decorative items. That balance keeps the core functional without ignoring the finishes.
The Best Affordable Storage Systems for Small Closets
Three systems dominate the affordable market for small closets: wire shelving, modular cube units, and tension rod setups. Each has different strengths.
Wire Shelving Systems
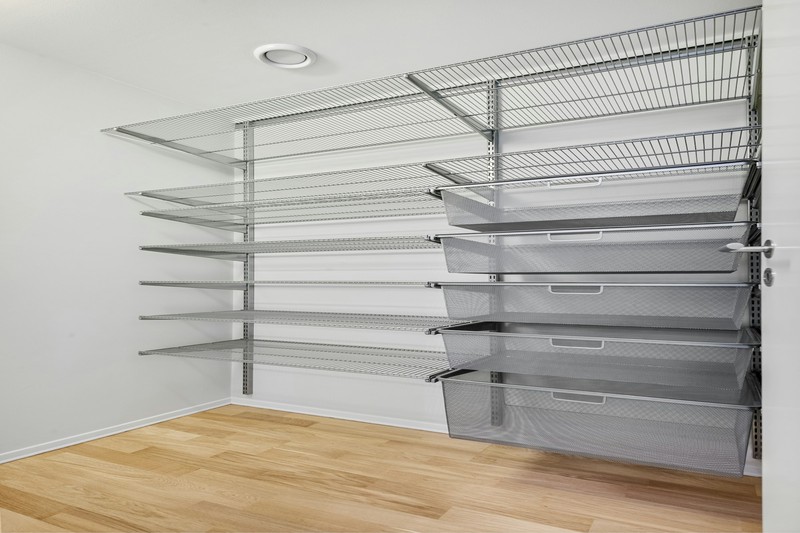
These are the most common and often the most practical for small closets. Brands like ClosetMaid and Rubbermaid make kits that fit standard reach-in sizes. Cost is around $80–$150 for a basic setup. They’re relatively easy to install with a drill and a level, though you’ll need to cut some shelves to length. The biggest advantage is adjustability—you can move shelves and rods as your needs change. The downside: wire shelves can look industrial. But painting the brackets to match your wall mitigates that. Find a well-rated wire shelving system on Amazon. Best for: standard reach-in closets where you want flexibility and durability.
Modular Cube Units
Think IKEA Kallax or similar cube storage systems. These are great for closets that are wider than they are deep. You can combine cubes for shelves and add bins for folded items. Cost is generally $60–$120 for a 2×2 or 3×2 unit. Installation is simpler than wire shelving because it’s just assembly. The tradeoff: they use a lot of vertical space and can look bulky if not painted or styled well. Best for: closets where you need a lot of folded storage and don’t need long hanging space. Check out popular modular cube units on Amazon.
Tension Rod Setups
This is the cheapest option. A set of two or three tension rods costs under $30. You can install a second rod below the existing one for double hanging, or use a single rod with a shelf above. The main advantage is cost and no tools required. The drawback: tension rods aren’t as sturdy, especially for heavy coats. They’re best for temporary solutions or for closets where you only hang lighter items. Best for: renters or anyone needing a quick, low-cost solution. Shop for adjustable tension rods on Amazon.
Here’s a quick comparison:
- Wire shelving: $80–$150, tool installation, highly adjustable, durable
- Modular cubes: $60–$120, easy assembly, good for folded items, bulky
- Tension rods: $15–$30, no tools, temporary, not for heavy loads
Choose based on your primary need: hanging vs. folding, permanence vs. flexibility, and budget.
5 Mistakes That Waste Your Small Closet Budget
I’ve made most of these at some point. Here’s what to avoid.
1. Buying Non-Adjustable Systems
Fixed shelving or built-ins that can’t be reconfigured are a trap. Your storage needs change. If you buy a system that’s glued or nailed in place, you’re stuck with it. Always choose modular, adjustable components.
2. Ignoring Lighting
A small closet without good light feels dark and difficult to use. Spending $15 on a basic LED light is a no-brainer. Not doing it leads to frustration and underutilization of the space.
3. Over-Buying Bins and Baskets
It’s easy to grab a few cute bins, but they often end up shoved in a corner, empty. Only buy storage containers after you know exactly what you’re storing and how much space they need. Otherwise, you’re just buying clutter.
4. Choosing Trendy Over Durable
A cheap plastic system might look fine for a season, but it will warp, sag, or break. Spend a little more on materials that last—wire shelving with epoxy coating is better than basic chrome. Durability saves money in the long run.
5. Skipping a Design Plan
Going to a store and buying random pieces without a layout plan is a recipe for waste. Draw a simple floor plan, note dimensions, and list what you need before you buy anything. It takes 30 minutes and can save hundreds.
Upgrading on a Dime: High-End Looks with Low-Cost Materials
A small closet can look custom without spending thousands. These are the tricks that make the biggest visual impact for the least money.
Paint the walls a rich tone. White is fine, but a dark navy, charcoal, or sage green makes a small closet feel intentional and luxurious. A quart of good paint costs $15–$20. I’ve used Benjamin Moore’s Hale Navy and it transformed a 3×5 reach-in into a jewel box.
Use matching velvet hangers. The uniform look of black or cream velvet hangers instantly elevates a closet. A 50-pack runs about $20 on Amazon. It’s one of the cheapest visual upgrades you can make.
Install peel-and-stick wallpaper. This is the quickest way to add pattern and depth. Brands like NuWallpaper or RoomMates have designs that cost $30–$50 for a roll covering about 28 square feet. I’ve used it on the back wall of a closet to create a focal point. It’s removable, so it’s renter-friendly.
Swap out hardware. If you have a closet rod with finials or shelf brackets with visible screws, replace them with simple, modern hardware. A set of brushed gold or matte black brackets costs around $10 on Amazon. Check out updated closet hardware options.
Add a battery-operated LED strip. Motion-activated LED strips are around $12–$20 and can be mounted under shelves or along the top of the closet. The warm light setting softens the space and makes colors look richer.
Hiring Help vs. Going Solo: Cost Decisions That Matter
Whether to hire a professional organizer or install yourself depends on the complexity of your project and your comfort with tools.
DIY works best for simple systems. Tension rods, modular cube units, and basic wire shelving kits are all straightforward to install with a drill, level, and tape measure. The cost is just your time. If you have a standard reach-in closet with straight walls and no unusual features, there’s no need to hire help.
Hiring a pro makes sense for custom or complex setups. If you want a built-in cabinet, a full wall of shelving, or a system that requires cutting materials precisely, the cost of a professional (typically $100–$200 per consultation plus install fees) can prevent expensive mistakes. In those cases, paying for expertise saves money by avoiding returns and damaged materials.
Consider the tool investment. If you already own a drill, level, and stud finder, DIY is easy. If you have to buy them, factor $50–$100 into your budget. A basic cordless drill costs around $40 and is worth owning anyway, but it’s still a cost to weigh.
The 30-Day Low-Cost Closet Refresh Plan
Here’s a step-by-step timeline that keeps spending under control.
Week 1: Declutter and Measure
Remove everything. Sort into keep, donate, and toss. Measure the closet thoroughly. Decide on a layout: hanging, folded, shoes, accessories. Set your budget—write it down.
Week 2: Buy Key Pieces
Based on your measurements and plan, purchase your shelving system or rods. Buy hangers and a riser rod if needed. Do not buy decorative items yet. Stick to the structural foundation first. Find your shelving kit here.
Week 3: Assemble and Install
Install the shelving or rods. Add hangers. Hang clothes back by category (shirts, pants, jackets). Use the second rod for shorter items. Add a shelf above the rod for out-of-season storage. If you’re using a modular cube unit, assemble it and arrange it in the closet.
Week 4: Final Touches
Add lighting. Install the peel-and-stick wallpaper if you’re using it. Add bins for accessories or socks. Tweak the layout if something feels off. Step back and assess. Does the space feel functional?
Ready to get started? Find your options here.

Frequently Overlooked Small Closet Accessories That Add Value
These are small, affordable items that solve specific problems.
- Belt hooks: A simple three-hook set that screws into a shelf or wall. Cost is $5–$10. Keeps belts untangled and visible.
- Valet rods: A fold-out rod for hanging tomorrow’s outfit. Around $15–$20. Saves space and adds a hotel-like touch.
- Magnetic strips: Mount inside the door for metal accessories like earrings or hair clips. Cost is $8–$12. Keeps small items from getting lost.
- Pull-out hampers: A slim, collapsible hamper that slides into the bottom of the closet. Around $20–$30. Keeps dirty clothes out of sight.
- Slim shoe racks: Over-the-door or tension-mounted racks that hold 6–8 pairs. Cost is $15–$25. Best for flats and sneakers. Shop slim shoe racks on Amazon.
Realistic Expectations: What Your Small Closet Budget Can and Can’t Do
Here’s what different budget levels realistically achieve for a typical 4×8 reach-in closet.
$200 budget: You can buy a good set of velvet hangers, a riser rod, a basic tension rod system or light-duty wire shelves, and a few fabric bins. This reorganizes and declutters but may not add significant storage capacity.
$500 budget: This allows for a full wire shelving system with adjustable shelves and rods, good lighting (two puck lights), and a set of quality hangers. You can also add a slim shoe rack and a small set of modular cubes. This is the sweet spot for a complete, functional refresh.
$1,000 budget: At this level, you can install a higher-end modular system with real wood or laminate shelves, better brackets, and integrated lighting. You may also hire a professional for layout and installation. The result is a near-custom look that lasts for years.
What you can’t do: For $200, you can’t get a full custom built-in with soft-close drawers and specialty compartments. Setting those expectations early prevents disappointment and keeps your focus on practical, effective solutions.
Conclusion
A small closet budget doesn’t limit your options—it sharpens them. Measure first, prioritize spending on structural components, avoid the common mistakes I’ve listed, and use low-cost upgrades like paint and lighting to elevate the look. The result is a closet that feels designed for you, without the designer price tag. Ready to get started? Find your options here.